

60% of customers cite delivery options as the key factor when choosing an online provider. 70% of US customers prefer businesses that provide multiple delivery options. Hence, considering your customers’ demands, we came up with the Magento 2 Delivery Date and Time extension.
Our delivery date scheduler allows your customers to choose the date and time of delivery and even when not to deliver. For instance, they can choose to have things delivered between 9 AM and 12 PM or not deliver between 3 PM and 6 PM.
You (as admin) can configure the backend to exclude holidays, time-slots, and other combinations that are not suitable for delivery. With our extension, you can even create and manage delivery time slots for the entire week and set the maximum quota for each slot.
Our Magento 2 Delivery Date and Time extension helps you serve your customers the way they need you to – with features and methods explained below.
Before we dive into the features, here’s is how to start with Magento 2 Delivery Date extension.
Magento 2 Delivery Date: Features
Our Delivery Date and Time extension makes it convenient to manage shipping and delivery with features such as:
- Date selection on the product page, checkout, or cart page
- Store-level or product-wise order processing time
- Count-down timer to indicate same-day delivery
- Daily order limit
- Support for multi-address delivery
- Limited delivery option based on cart amount
- Support for Rest API and GraphQL
Even the installation process is effortless. A few steps, and it’s done. Let’s learn those steps ahead.
Installation and Activation
You can deliver our Magento 2 Delivery Date and Time extension in two ways – based on OS or via composer.
Based on Operating System
Step 1:
For Windows OS:
Go to < your Magento install dir >/app/code. Under that, create the folders using the following hierarchy:
- Biztech
- Delivery Date Scheduler
For Linux OS:
Enter the following commands keeping their order:
- cd < your Magento install dir >/app/code
- mkdir -p Biztech/Deliverydate
- mkdir -p Biztech/Deliverydatepro
After this, find the Download Zip and extract all files and folders in Biztech/Deliverydate and Biztech/Deliverydatepro.
Step 2:
After the successful installation, you have to run the command on the Magento2 root directory-“php bin/magento setup: upgrade”.
If you see a blank page or permission error, go to Terminal (Linux)/Command Prompt (Windows).
- cd [magento root directory][var]
- Run the following command
- $ chmod –R 777 *
Step 3:
After running the command, log into the admin panel and clear the Cache. Go to SYSTEM -> Tools (section) -> CACHE MANAGEMENT to clear the cache.

Step 4:
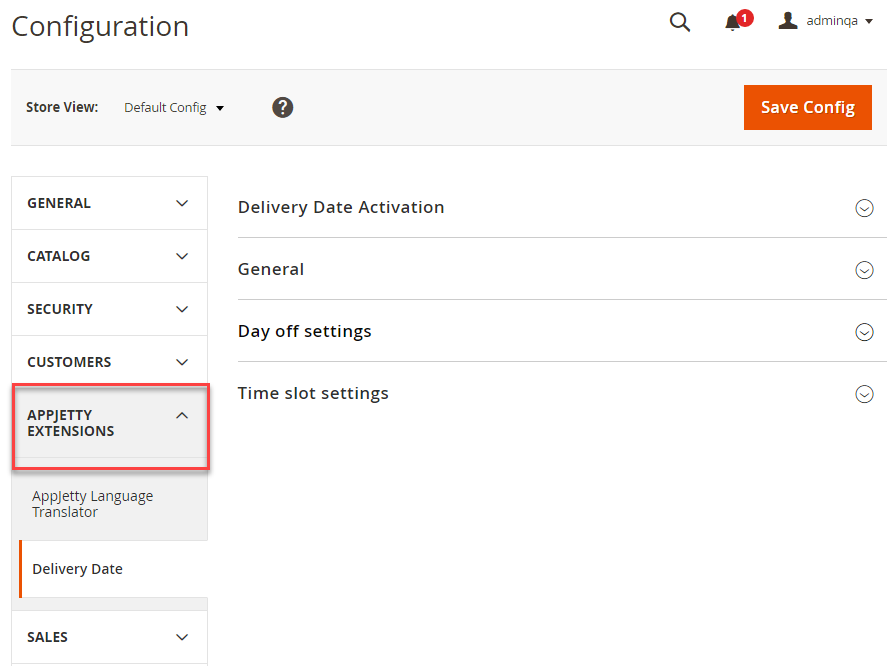
After the successful installation, you can see the “Delivery Date” under the AppJetty Extensions tab inside STORES -> CONFIGURATION.
Installation via Composer
Step 1:
- Create a new folder on your preferable server path. Add Extension zip archive into the created folder.
Step 2:
- Use Your SSH details to connect to your server. After connecting to the SSH, change your working directory with one of your Magento setup paths using the below command.
cd /PATH/TO_YOUR_MAGENTO_SETUP_PATH
Step 3:
- Now you have to define the folder with the extension’s archive as a repository for composer reference. For this, run the Composer command:
composer config repositories.biztech artifact /ABSOLUTE_PATH_TO_ZIP_Archive_FOLDER/
- For example:
composer config repositories.biztech artifact /Packages/Biztech/
After executing this command, it will automatically add Repository Details in composer.json file.
Step 4:
- Perform the following command for installation of the module:
composer require biztech/Delivery date
Step 5:
- After successful installation using the above command, you can verify the module status using the below command:
php bin/magento module:status
- You can check the newly added module in the List of disabled modules.
Step 6:
- Now you can upgrade your setup using the below command.
php bin/magento setup:upgrade
- It will enable the module and do the automated process Magento requires.
Step 7:
- You can now compile the modules using the below command.
php bin/magento setup:di:compile
Step 8:
- In case, if you have to update our extension from a composer, you can use the below command:
composer update biztech/Delivery date
- But before using that command, you should place the latest Extension zip archive into the
/ABSOLUTE_PATH_TO_ZIP_Archive_FOLDER/
- After executing the above command, your module is updated. Now you just have to run the upgrade command same as step 6 and compile the command same as step 7.
Delivery Date and Time Configuration
After installing our Magento 2 delivery date and time extension, you need to activate it by following the steps mentioned below.
Extension Activation
- Get the activation key from the Order Confirmation Mail.
OR
- Login to your AppJetty Store account, then go to Downloadable options and copy the activation key for the Delivery Date and Time extension.
Activate your Extensions
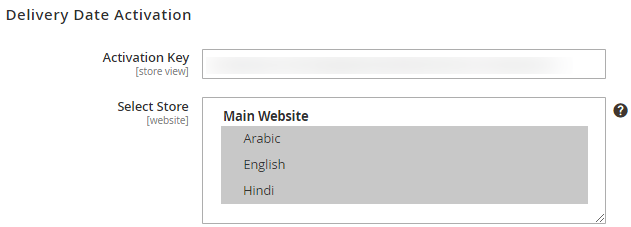
- Log into Magento 2 Admin Panel and go to Store -> Configuration -> AppJetty Extensions/Delivery date Activation.
- Enter the activation key in the ‘Activation Key’ field for the Delivery Date and time extension.
- Click the ‘Save Config’.
Select Websites
When you enter and save the key, it will be verified on our server, and you can select the websites where you need to use the Delivery Date Scheduler extension. Click the ‘Save Config’ button after making your selections.
Delivery Date Scheduler got activated! You are now ready to use our Magento 2 Delivery Date and Time extension. But first, you have to set configurations.
General Configuration
Please follow the below steps to enable Delivery Date and Time.
- Go to Store -> Configuration. In the left column, you will see the tab Appjetty Extensions -> Delivery Date.
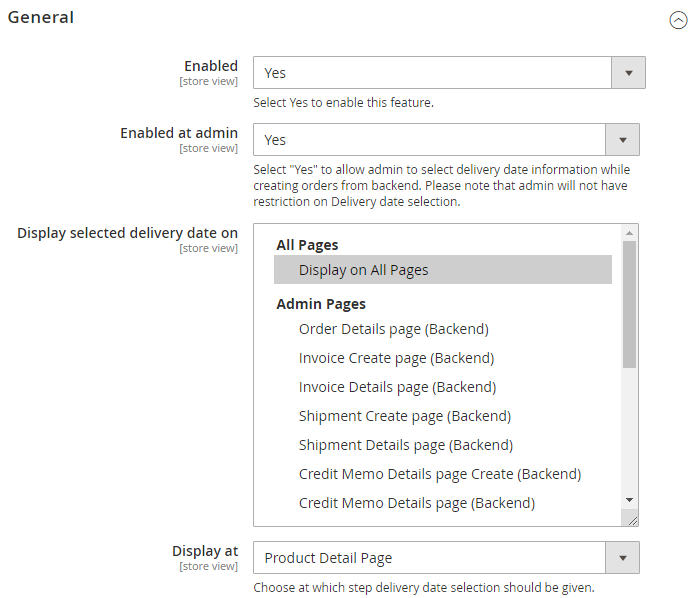
- Enabled: Select ‘Yes’ to enable the Delivery Date and Time extension. The extension is set to disable by default.
- Enabled at Admin: Select ‘Yes’ to let admin select the delivery date. This selection will be done at the time of creating orders from the backend.
Frontend Configurations
Select and configure the required options for Front End.
Show Delivery Schedule In: Set ‘Calendar View’ to display a calendar and set ‘Time Slot View’ to display time slots for delivery date selection.

If you have selected the Calendar View, the following options will available:
Date Display Mode: Select the relevant mode to display the date. The four different modes provided are Calendar, Radio Button, Dropdown & Button.
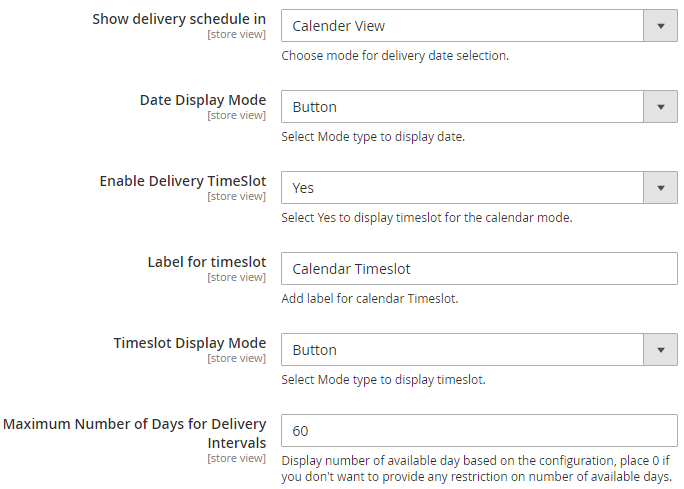
If you have selected Yes to the Enable Delivery TimeSlot, the following options will be available:
- Label for timeslot: Insert a ‘label’ for a calendar time slot.
- Timeslot Display Mode: Select the relevant mode to display the Time Slot from the provided modes: Radio Button, Dropdown Button.
- Maximum Number of Day for Delivery: Inset the days (in months) to define the number of days you want to make available for selection as delivery date to your customers.
The following options are common for the “Checkout Shipping Method” and “Product Detail Page”:
- Enable Cut-Off Time: Select ‘Yes’ to enable cut-off time for orders. Cut Off time defines the time after which orders made would be considered for the next day.

- Disable Same Day Delivery After (Cut Off): Select the time after which you want same-day delivery to be disabled.
- Make Delivery Date Mandatory: Set ‘Yes’ to make the delivery date as a required field.
- Label for Delivery Date: Enter text to display as Label for the delivery date on the front end.
- Label for Delivery Date Comments: Enter text to display as Label for delivery date comment in front end.
- Enable Call Me Before Delivery: Select ‘Yes’ to enable the ‘call me before delivery’ option.
- Label for Call Me Before Delivery: Enter text to display as the label for ‘call me before delivery’ on the frontend.
- Show Additional Info: Select ‘Yes’ to display additional information to customers.
- Additional Info for Customers: You can add a custom message to notify customers if any special instruction is there.
- Date Format: Defined date format will be displayed in the frontend and admin panel. i.e. d/m/y, d-m-y etc.
- Time Format: Define time format, which will be displayed in the frontend and admin panel. i.e., g:I a or H:i:s
Delivery Date Related Configurations
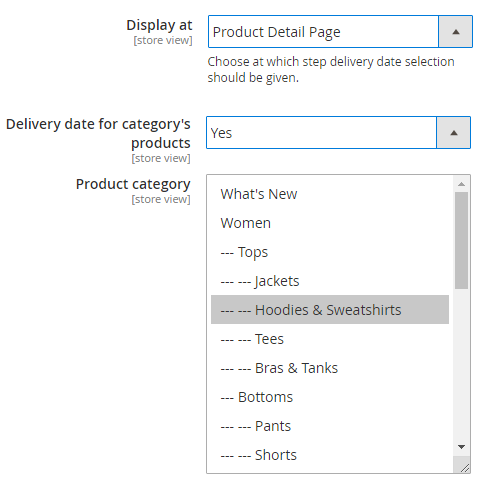
Display At: Select the page option on which you want to provide a selection of delivery dates. It can be either on the Checkout Shipping Page or on the Product Detail Page.
Checkout Shipping Method
If you have selected the “Checkout Shipping Method”, configure the following options:
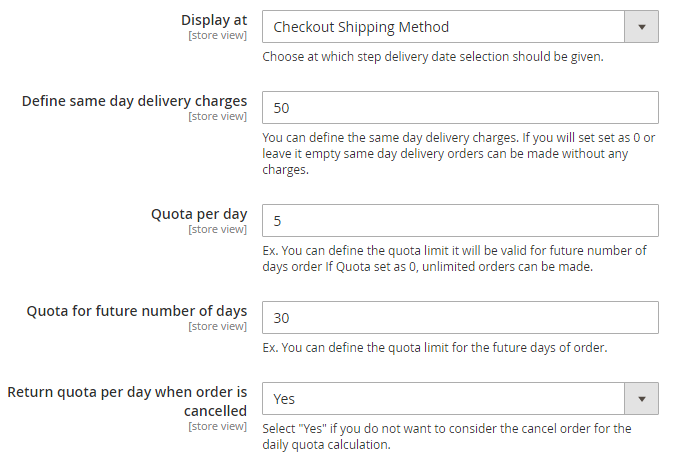
- Quota Per Day: Define order quota for a day; after that limit, the user will not be able to place a delivery order for that day.
- Quota for Future Number of Days: Define the quota limit for the future days of order.
- Return Quota Per Day When Order is Cancelled: Select ‘Yes’ if you don’t want to consider the cancel order for the daily quota calculation.
If the admin has selected the Display at “Checkout Shipping method,” admin can select configure the Email options:

- Do You Want Email Notification?: Select ‘Yes’ for getting email notification for shipment of an order on a particular date.
- Email Notification Period: Define days when you want to get an email notification for order shipment.
- Select Admin Email Template: Select the default template for Admin about delivery.
- Email Notification Id: Send email to the inserted email id.Note: You can define multiple email addresses by using comma-separated.
- Do you want an email notification to be sent to the customer?: Select ‘Yes’ to send email notification regarding the shipment of an order.Note: If same-day delivery is enabled, then email reminders are not sent to the customers.
Other options are:
- Enable Delivery Date Based on Shipping: Select ‘Yes’ to enable the shipping methods.
- Shipping Methods: Select the Shipping method(s) from the list of available shipping methods.
- Restrict Delivery Option Based on Cart Amount: Select ‘Yes’ to enable the delivery date selection only when the Cart amount is more than inserted cart value in ‘Cart amount’.
- Cart Amount: Insert the minimum cart amount to display the delivery date selection only when the Cart value exceeds the inserted value here.
- Enable Delivery Selection for Multi Addresses: If you allow customers to select the date for multiple addresses of the multiple orders, select ‘Yes’ to enable multiple shipping addresses.
- After configuring the above details, click on the “Save Config” button.
Product Detail Page
If the admin has selected the Display at “Product Detail Page”, the following Product Category options will appear:

- Delivery Date for Product Category: Select ‘Yes’ to enable delivery dates selection at the product level. This option would show up only when the Product Detail Page is the option selected as the ‘Display At’ option.
- Product Category: If the above option is set as ‘Yes’, select the category you want to provide an option for delivery date selection.
Cart Page
- Delivery Option Based on Cart Amount: Select ‘Yes’ to enable the delivery date selection only when the cart amount is more than inserted cart value in ‘Cart amount’.
- Cart Amount: Insert the minimum cart amount to display the delivery date selection only when the cart value exceeds the inserted value here.
- After configuring the above details, click on the “Save Config” button.
Common Configurations (Checkout, Product, and Cart Page)
The following options are common for the “Checkout Shipping Method”, “Product Detail Page”, and “Cart Page”:
- Include Additional Delivery Charge: Select ‘Yes’ to enable additional charge on delivery by configuring the delivery charges related options.
- Allow Product Based Delivery Charges: Select ‘Yes’ to enable product-based delivery charges individually.
- Additional Delivery Charges: Select the delivery charge for ‘Same Day Charge’ or ‘Per Day of Week’ by adding a specific day for an additional charge.
- Per Day of Week: Add a specific day for an additional charge for delivery on that day.
- Order Processing Time: Insert the day(s) to process and manage the order. If you have inserted 0 (Zero), it means the order will be provided on the same day.
- Delivery Options Level: Choose at which step order processing time should be considered. Global or Product Level.Note: If two products with different processing periods are added to the cart, final delivery will be made based on higher processing time.
- Enable Cut-Off Time: Select ‘Yes’ to enable cut-off time for orders. Cut Off time defines the time after which orders made would be considered for the next day.
- Disable Same Day Delivery After (Cut Off): Select the time after which you want same-day delivery to be disabled.
- Enable Product Wise Cut Off: Select ‘Yes’ to enable product-wise cut-off. Cut off will consider on product level for checkout, cart, and product page.
- Show Same Day Delivery Ends Timer: Select ‘Yes’ to display the timer as per the Cut Off time.
- Delivery Date for Customer Groups: Select ‘Yes’ to enable delivery date for specific customer groups.
- Customer Groups: If selected yes in the above option, you need to select customer groups for whom you want to provide delivery date selection.Note: Multiselect option is available to select multiple groups.
Product Level Delivery Date
The following options are common for the “Checkout Shipping Method”, “Product Detail Page,” & Cart Page:
- Additional Delivery Charge: Insert the additional delivery charge on order for a specific product. If you keep it 0 (zero) or empty, no additional charge for the selected product will be added.
- Order Processing Time: Insert the number of days needed to prepare the order. Leave it blank to provide same-day delivery.
- Insert the Cut Off Hour, Minutes & Seconds.
Time Slot Settings
- Label for Timeslot View Table: Default label that you would want to keep for time slot selection.
- Add no. of Delivery Days: Provide the no. of days for which you are going to provide delivery.
- Minimum Interval of Hours Between the Order Placing Time and Delivery Time: You can add the time interval in hours which will be the minimum gap between the order placing and delivery time i.e., Customers will not be able to select the delivery time less than the hours you have entered.
- Add Time Slot: Admin can add the time slot in sorting order by entering the fields for “Start time”, “End time” and “Price”. You can charge extra for specific time intervals under the price.
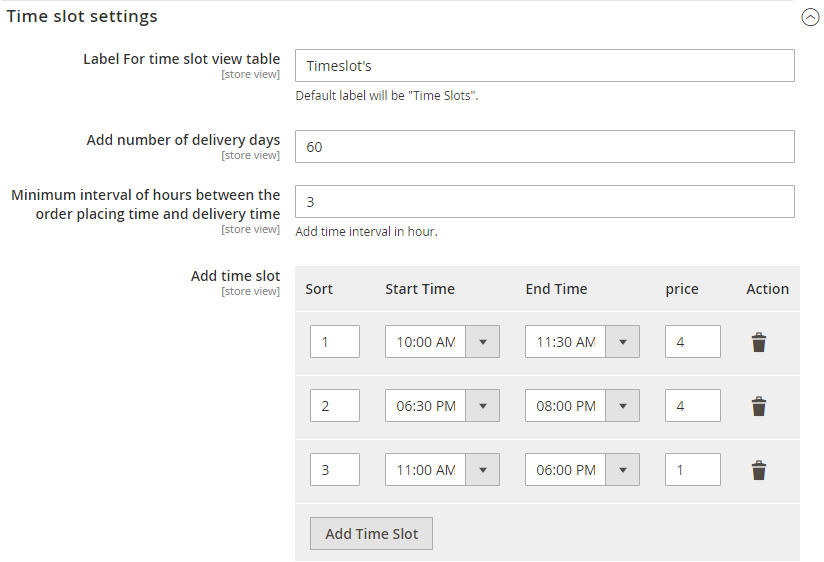
- By clicking on the Add Time Slot button, the admin can add more slots as per the requirement and provide the delivery availability. This helps manage delivery time slots easily.
- Disable Time Slot of Day: Here you can select the “Day” and “Timeslot” which you want to disable, i.e., the customer will not be able to select that day and time slot.
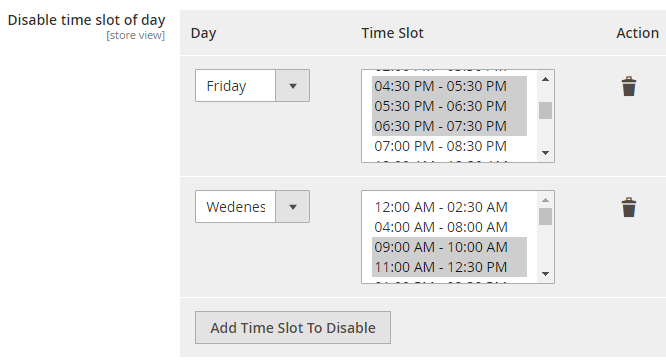
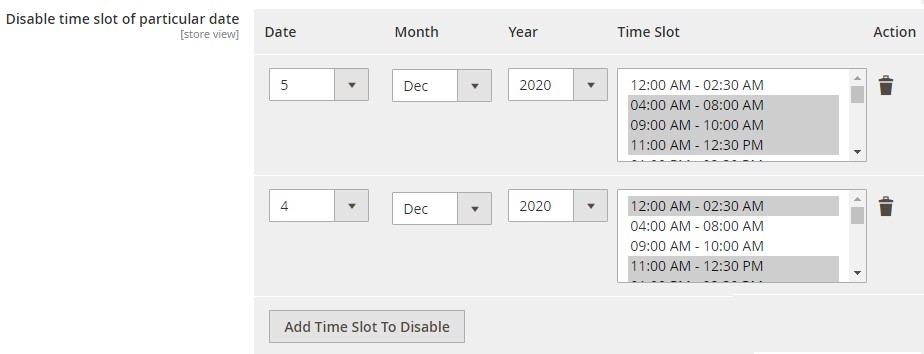
- Disable Time Slot of Particular Day: You can select the “Date”, “Month”, “Year” and “Timeslot” which you want to disable.
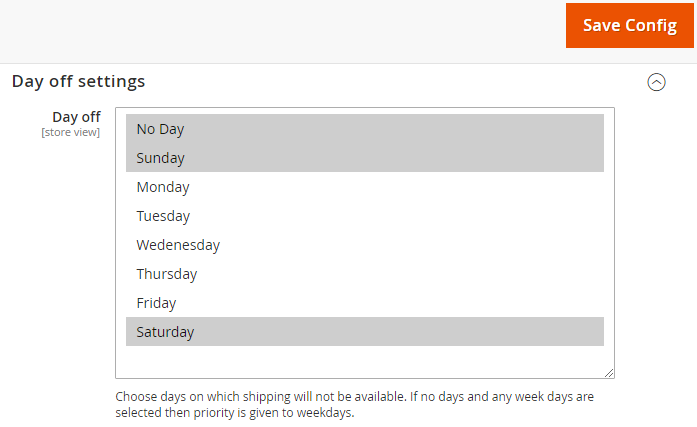
Day Off Settings
Day Off: Select day when you don’t provide shipment, so customers can’t select that day.
Single Day Off: Set and Disable single day offs (Festivals and national holidays). You can select the date, month, and year from the drop-down button as required.
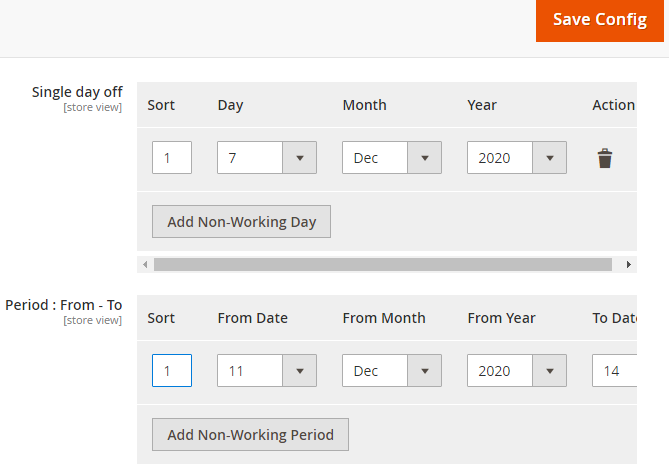
Period, from-To: Set and disable dates for a given period of time. When you have holidays for a couple of days then you can disable those dates.
After configuring the day off details, click on the Save Config button.
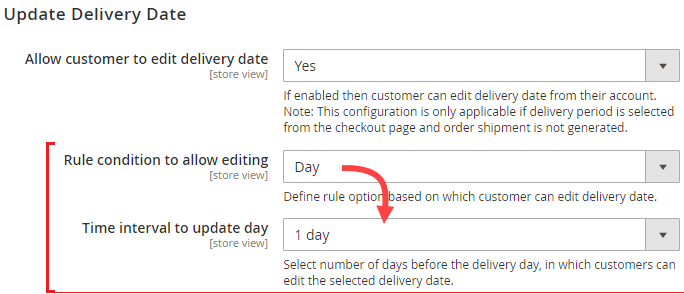
Update Delivery Date
- Customers can edit and update the desired delivery date for the order. As an admin, you can enable the Update Deliver Date option for the customers.
- Allow Customers to Edit Delivery Date: By selecting Yes, you can allow the customer to edit the selected delivery date once again and update the delivery date.
Note: Update delivery date is only applicable if the delivery period is selected from the Checkout Page and Order Shipment is not generated yet.
- Rule Condition to Allow Editing: Admin can define the rule option based on the selection of either Order Status or Day.
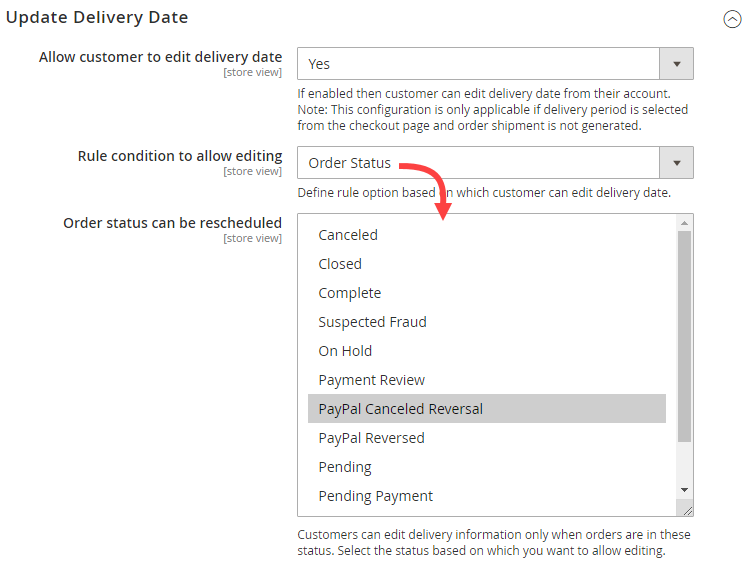
- Order Status can be Rescheduled: Select the Order status in which case the customers can edit the delivery date information.
- Day: If the admin selected Day, the Time Interval to Update Day will be available to select no. of days before that customers can edit the selected delivery date.
Manage Holidays
Navigate to Delivery Date Manage Holidays to add the upcoming holidays to manage the unavailable delivery dates.
You can filter and search the specific holidays; you can change the status of the holidays with multiple selections.
Click on the “Add New Holiday” button to add a new holiday detail.
- Holiday Title: Insert the relevant name of the holiday. i.e., Independence Day
- Annual: Select Yes if the holiday will occur every year.
- Day: Insert the date.
- Month: Select the month
- Year: This option will appear only when you have selected “No” to Annual option. You need to insert the (current) year here.
After selecting and inserting the details, click on the Save Holiday button. The added holiday will be added to the list.
From the delivery date selection, the customers will get the holiday dates disabled for selection.
Delivery Calendar
- Navigate to the Delivery Date Delivery Calendar to check the orders from the calendar view.
- You can easily check month-wise orders from the calendar view. You can check the previous month’s orders and next month’s orders.
Store View (Frontend)
Delivery Date Selection
- Once admin has configured the Delivery Date from the backend, the customers will get the delivery date option according to that configuration.
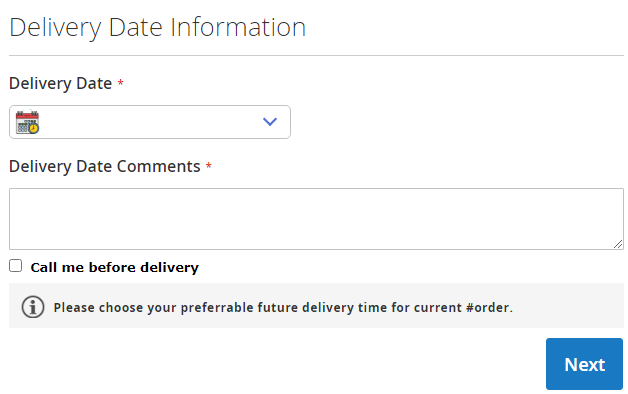
- The date display will appear as per the selecDisplay Mode” selection from the configuration. (Calendar, Radio Button, Dropdown or Button)
- Once the customer selects the Delivery Date, the Delivery Timeslot will also be enabled if admin has enabled from the Delivery Date configuration.
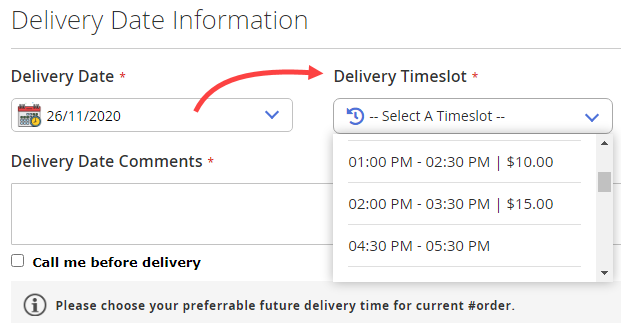
- The time list in the Timeslot will appear as per the selection of the available timeslots and the selected Timeslot Display mode (Radio Button, Dropdown or Button).
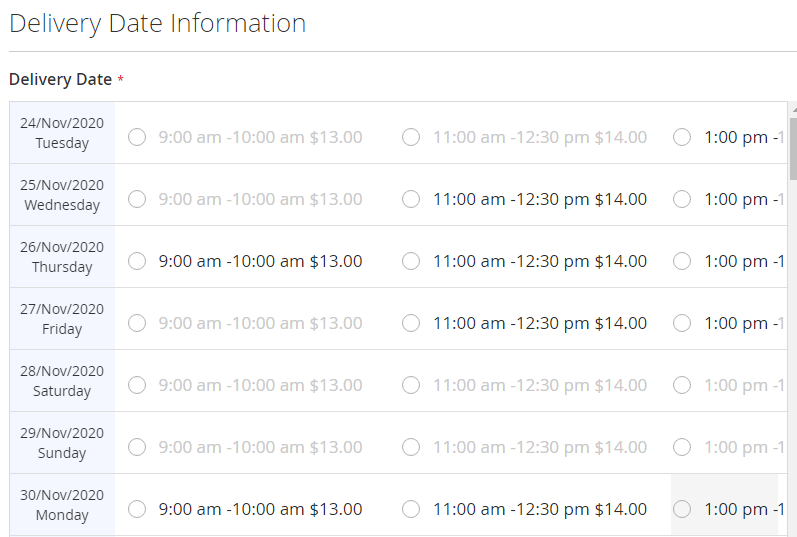
- If admin has selected the Timeslot View in the “Show delivery schedule in”, your customer will get date-wise all the time slots as shown below.
- Admin can disable the time slot and display just the date selection by disabling the Time Slots from the Delivery date configuration.
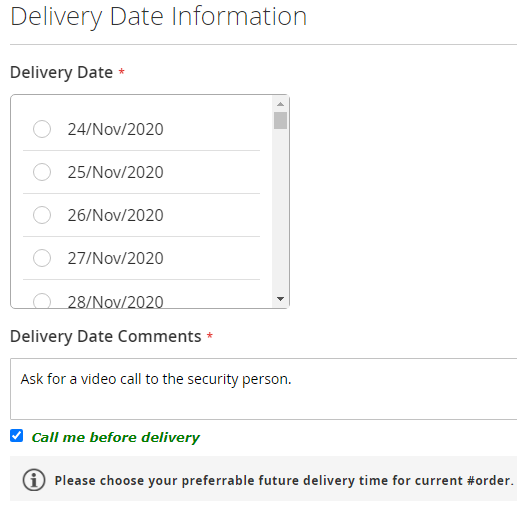
- Here, if the holidays are added for a specific date, the customers will get those dates disabled here.
- Similarly, if the admin has set the Delivery Date selection on the Cart page, the customers will get the Delivery Date option as per the configuration.
Delivery Date Selection on Product Page
- If the admin has selected the Delivery Date Display at the Product Detail Page, the customer will get the Delivery Date selection options on the product detail page.
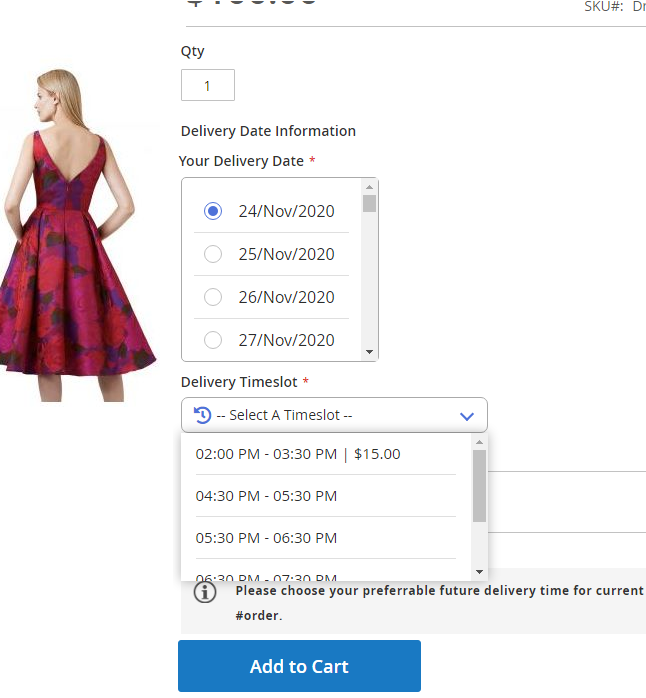
- You can also provide the customers same-day delivery timer for the products in case of all the products for which same-day delivery is available.
Order Summary Details
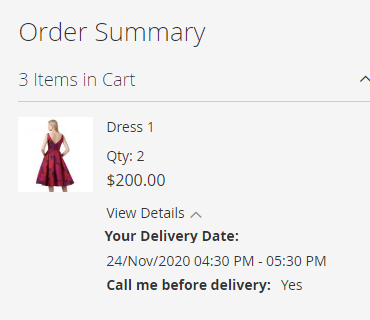
Once the customer selects their preferred delivery date and time slot, they can check the delivery date and its related options from the “Order Summary”.
Edit Delivery Date
Customers can edit the “delivery date” even after placing the order. Customers can navigate to the “Order View” from their account, and under the Order information, they will find the Edit button to update the Delivery Date.

Once the customer edited the Delivery date options, they must click on the Delivery Date button.
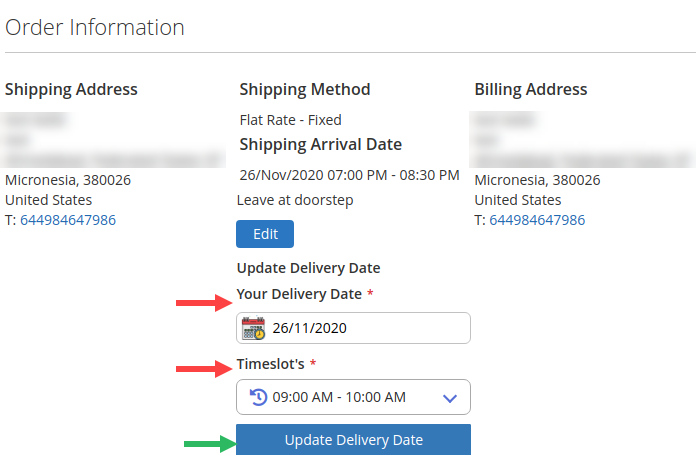
Note: The customer will get the Delivery Date options as per the backend configuration in the Delivery Date and if the order is shipped, the customer will not get the Edit Delivery Date option.
Date Selection for Multiple Addresses
- If you have enabled the “Delivery Date Selection for the Multiple Addresses” option from the Delivery Date configuration, the customers would be able to select the desired delivery date multiple addresses for their orders from the Checkout page.
- The customers will get the option of “Multiple Addresses” on the Shopping Cart page.
- By clicking on the “Check Out with Multiple Addresses” option, the customers will navigate to the “Ship to Multiple Addresses” page, where the customers will get the option to select the different addresses for the different products (orders).
- Once addresses are selected, click on the “Update Qty & Addresses” button, and go to the Shipping information page.
- Under the Shipping Method, the customers will get the Delivery Date Information. The customers can select the required Shipping Method and Deliver Date with its required details.
- Similarly, the customers can select the Delivery Date for other orders (products) under the shipping address.
- After selecting the Delivery date options, the customers can proceed with the payment, and before that, they can review the order details with delivery date and time information.
Admin’s Magento Dashboard
Dashboard
Once the customers order by selecting their preferable delivery date and time slot, admin can get the details on the Dashboard.
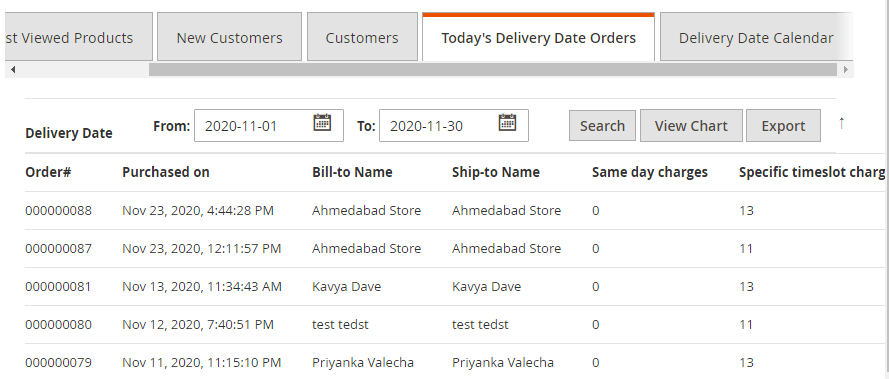
Admin’s dashboard view for “Delivery date calendar” where admin can see no. of order scheduled for a particular date with its details.
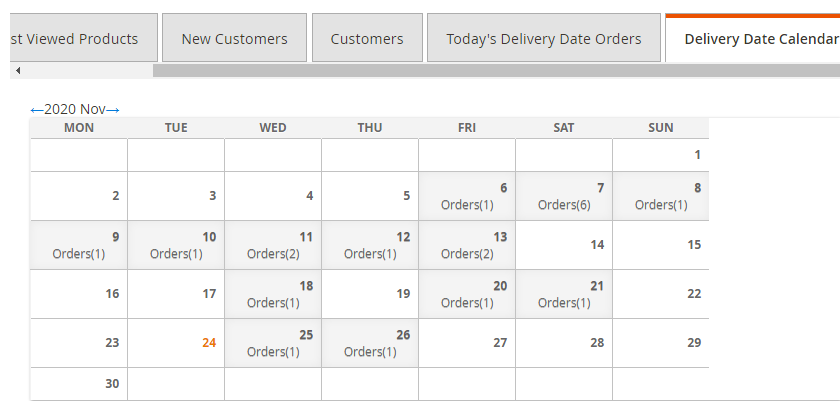
Delivery Date Calendar
- Once the customers place the orders, the admin can view all the orders under the “Delivery Date Calendar.” For that, navigate to Delivery Date Delivery Date Calendar from the Magento navigation pane.
- From the calendar, you will get the order number details as per the ordered date. By clicking on the order no., you will be redirected to the order details page (Sales Orders), from where you can check the order details and delivery date for the select order.
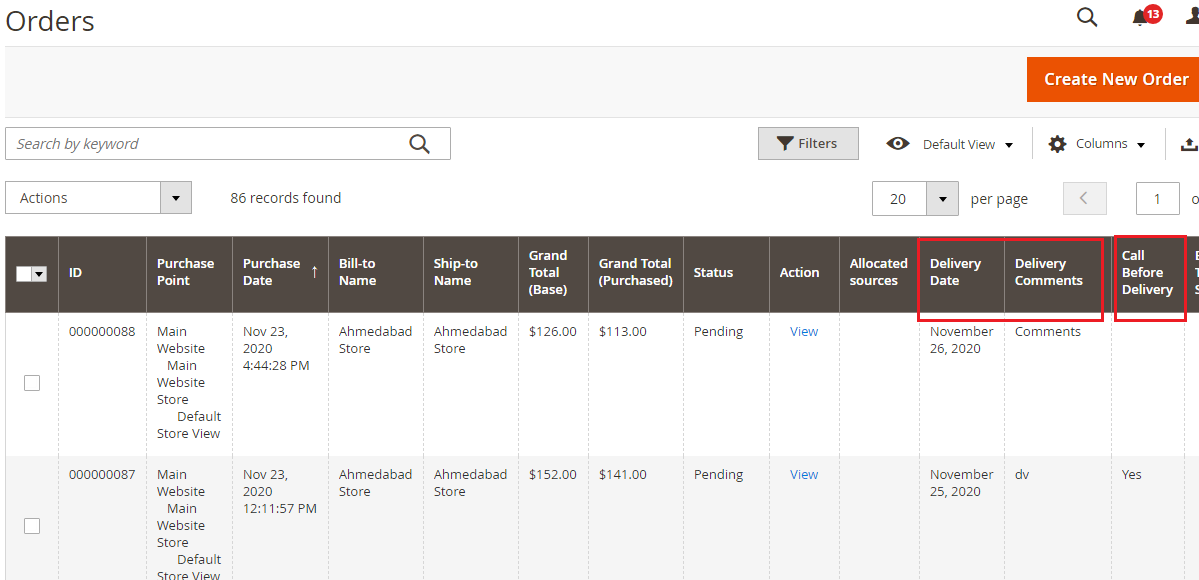
Sales Orders
Admin can view the delivery date information from the Sales Orders.
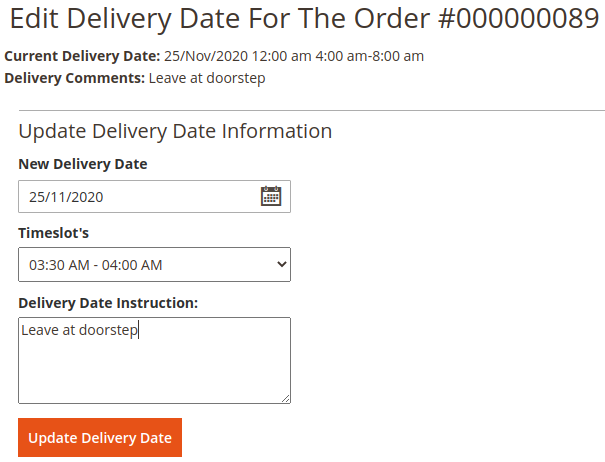
Edit Delivery Date
From the Order detail page, you will find the Edit option under the Shipping & Handling Information.
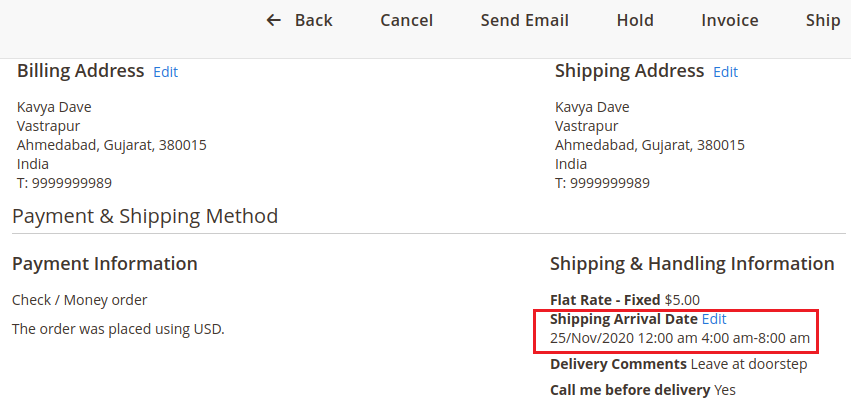
By clicking on the Edit button, the shipping date can be changed by Admin as per requirement.
By selecting the Delivery Date, Time Slot & inserting the comments, click on the Update Delivery Date option.
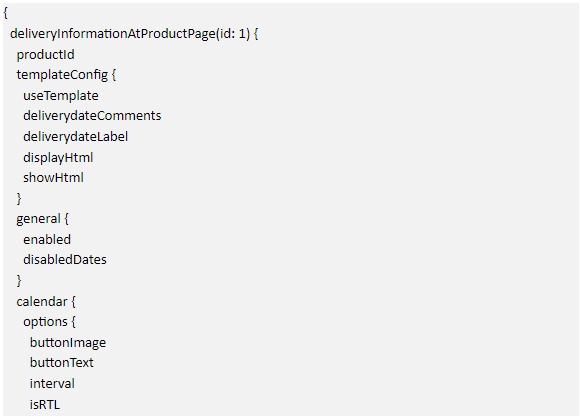
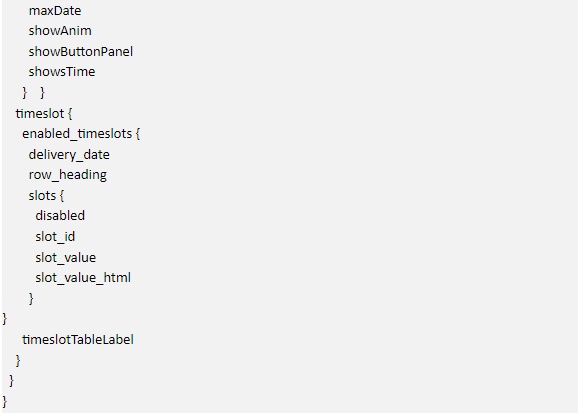
Magento API: REST AND GRAPHQL API
Rest API EndPoints
1. Get delivery info in the existing order details API:
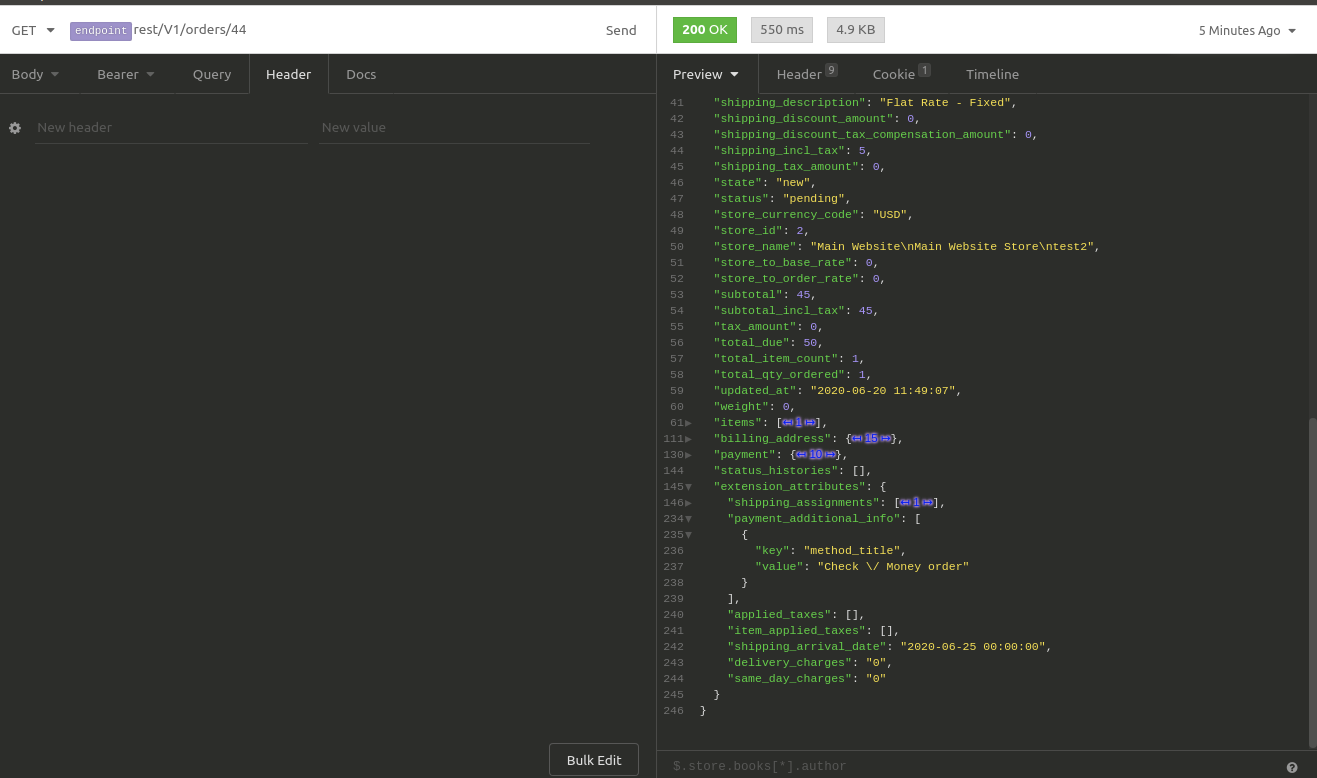
URL: SiteURL/rest/V1/order/:order_id
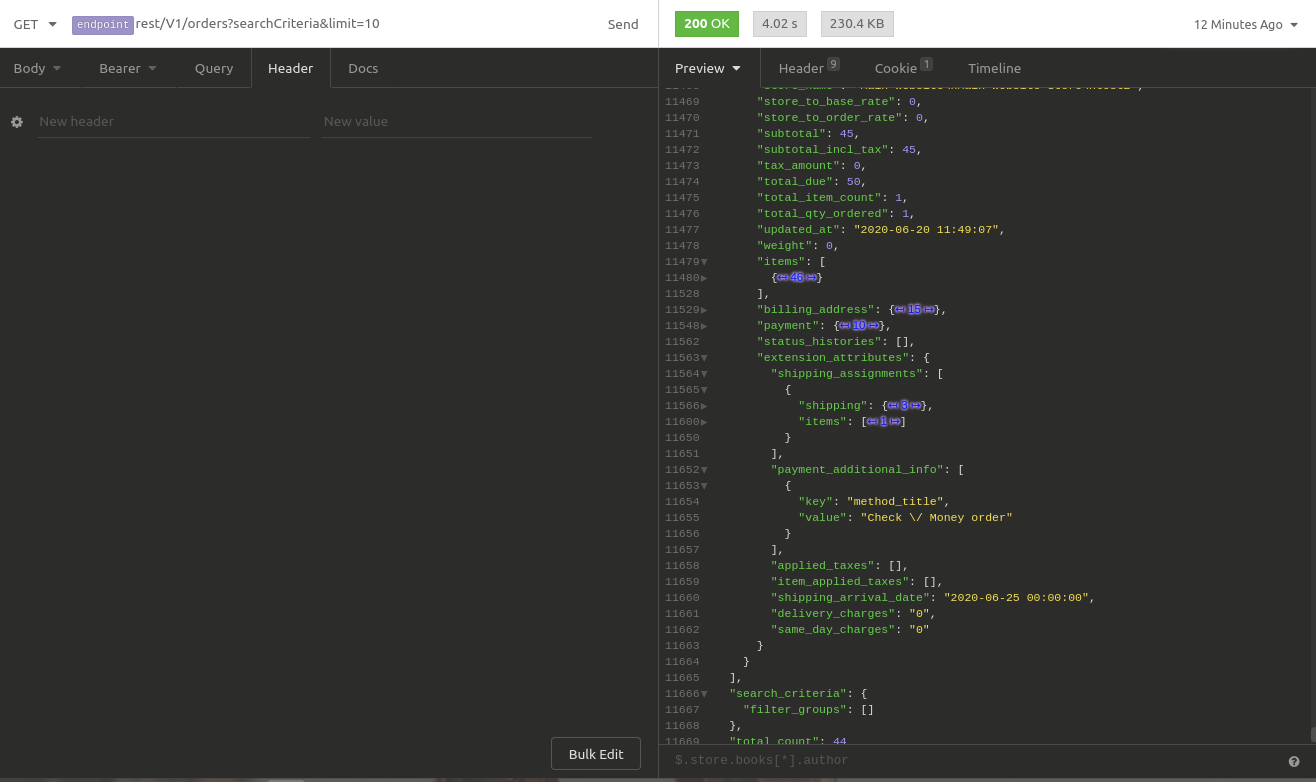
2. Delivery info of order in the search Criteria or Filter:
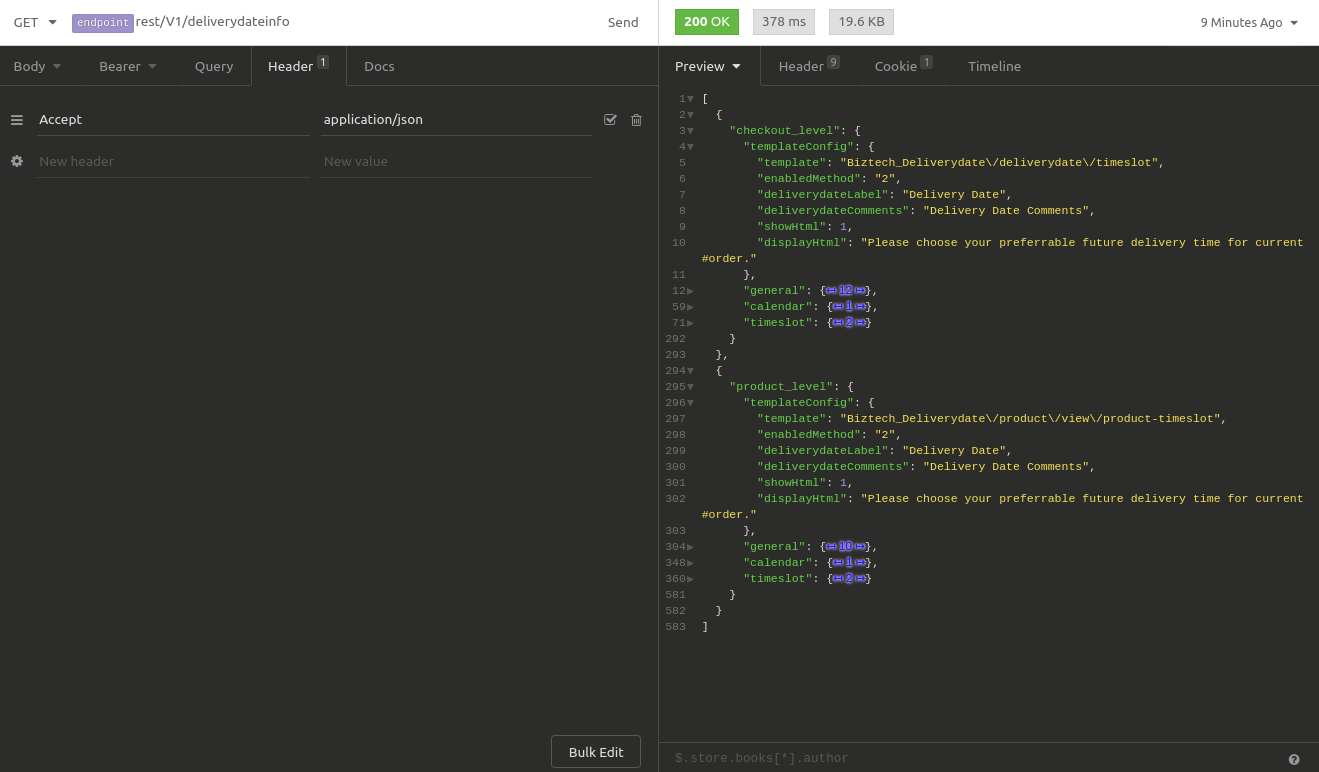
3. Delivery date information for date picker or timeslot.
URL : baseurl/rest/V1/deliverydateinfo
Graphql Endpoints
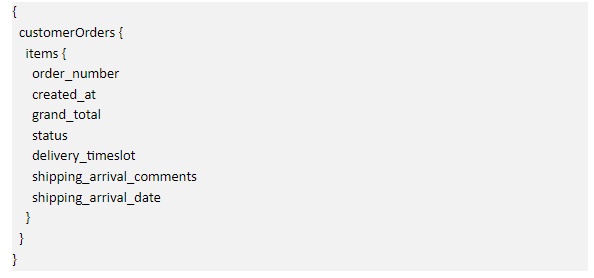
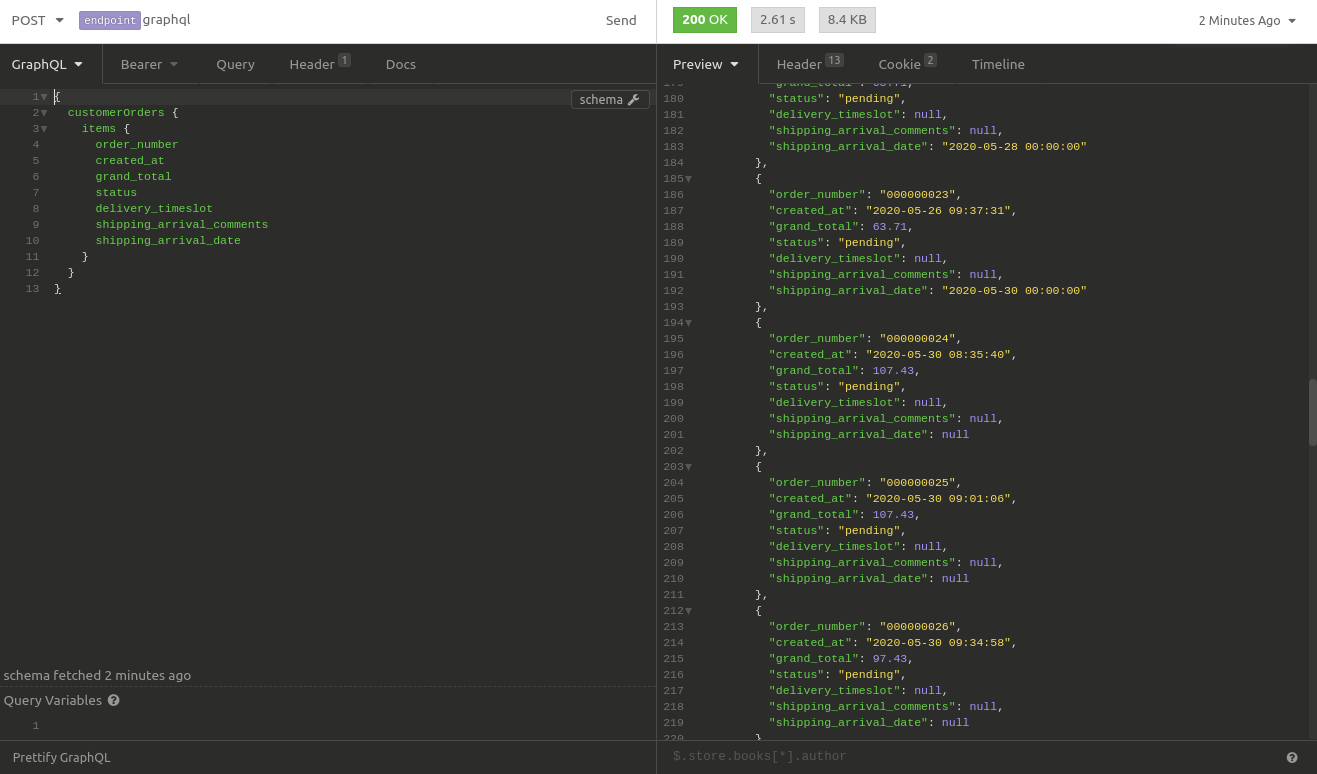
1. Customer order details with delivery information.
Query:
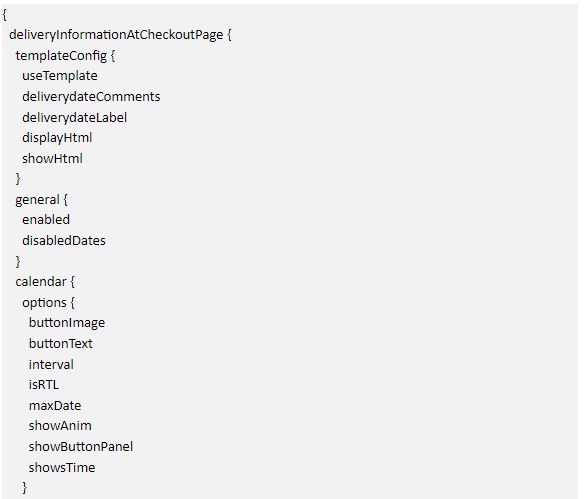
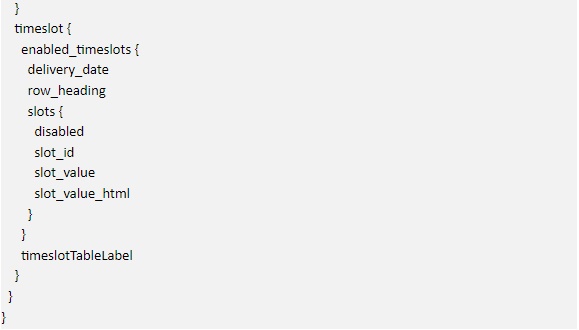
2. Delivery date information for date picker or timeslot in the Checkout page.
Query:
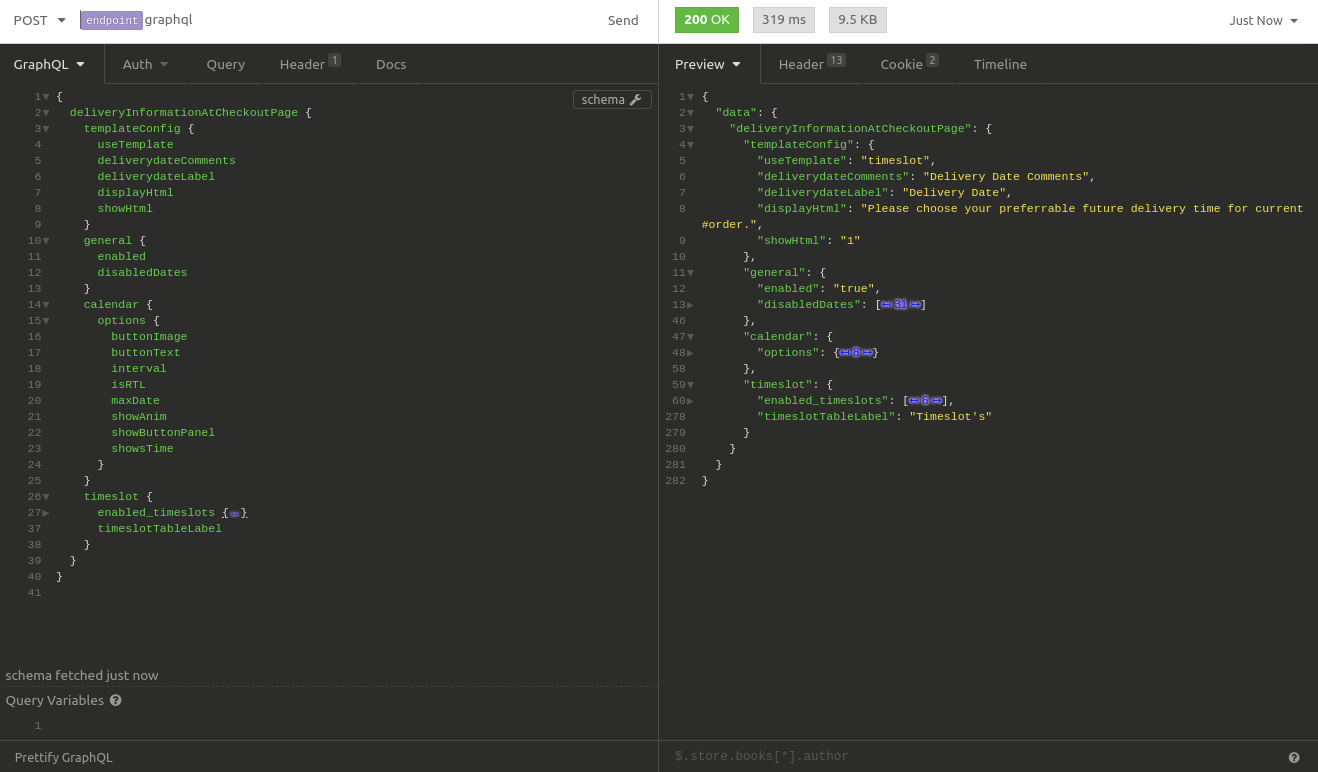
3. Delivery date information for date picker or timeslot in Product Details page.
Query:
Support
Following these steps, you can install and configure our Magento 2 Delivery Date and Time extension. If you need more information or help with customization, you can send an email to [email protected].
All product and company names are trademarks™, registered® or copyright© trademarks of their respective holders. Use of them does not imply any affiliation with or endorsement by them.


