

Microsoft Dynamics 365 gives sales teams everything they need to track leads, manage pipelines, and move deals forward. It is reliable, flexible, and built for teams that take their CRM seriously. But having a powerful CRM does not automatically mean your sales operation runs smoothly. The way you divide your market, assign your reps, and define who owns what, that is where most teams quietly lose ground. And yet, sales territory management in Dynamics 365 is one of the last things organizations stop to get right.
And that gap? It’s expensive.
When territories aren’t clearly defined, reps end up overloaded or underutilized. Deals fell through because ownership was never clear. High-potential areas go untouched while three people chase the same account. It’s not a people problem — it’s a planning problem.
Most companies default to spreadsheets or rough geographic splits that made sense three years ago. Markets shift, teams grow, and nobody updates the map. The guesswork piles up quietly until it shows up loudly in your numbers.
This guide cuts through all of that. You’ll learn how to build balanced, data-backed territories step by step — and how AppJetty’s MappyField 365 brings field sales territory planning to life directly inside Dynamics 365 Map, with smart mapping, clean assignments, and zero back-and-forth.
What Are Sales Territories and Why Do They Matter?
A sales territory is a defined boundary within which a rep or team owns the responsibility of generating business. That boundary can be geographic — a city, a zip code cluster, a region — or structured around industry type, account size, or customer segment. The shape matters less than the logic behind it.
When territories are well thought out, reps know exactly who they own and where to focus. Pipeline visibility improves, account conflicts drop, and revenue becomes far more predictable. Good sales territory management in Dynamics 365 gives managers a live, structured view of how the market is being covered and where the gaps are.
The problems start when businesses treat sales territory planning as a one-time task. The most common mistakes:
- Territories that are too large — reps get stretched thin and follow-ups fall apart
- Overlapping boundaries — two reps chasing the same prospect creates internal friction and a poor customer experience
- Geography-only splits — equal-looking regions on a map can be wildly unequal in actual opportunity
Solid field sales territory planning fixes all three, but only when it’s grounded in real data.
What You Need Before Building Your Sales Territories?
Before you draw a single boundary, you need the right foundation in place. Jumping into territory planning without clean data is how you end up redoing everything three months later.
Here is what you need to have sorted before you start:
Accurate, geocoded CRM data. Accounts, leads, and contacts need proper addresses attached to them. Incomplete location data means flawed territories. MappyField 365 takes care of geocoding automatically as part of its Dynamics 365 geo mapping engine, mapping every record to a precise location without any manual cleanup.
Clear segmentation criteria. Decide what your territories will be based on. Geography is a natural starting point, but layering in industry type, revenue potential, or account tier gives you boundaries built around real opportunity.
A realistic picture of your team. How many reps do you have? What is each person’s capacity? Are certain reps better suited for complex, high-value accounts? Territory design only works when it accounts for the people doing the actual work.
Defined coverage goals. Full market coverage, deeper penetration in key accounts, faster response in high-value regions, each goal points to a different territory structure. Know what you are chasing before you start drawing lines.
Getting sales territory management in Dynamics 365 right starts here, before a single boundary is drawn or a single rep is assigned.
Step-by-Step: Building Sales Territories in Dynamics 365 with MappyField 365
Setting up sales territories does not have to be complicated. With Dynamics 365 geo mapping built into MappyField 365, the whole process happens inside your CRM — no extra tools, no switching between platforms. Work through each step in order and by the end, your territories will be defined, assigned, and ready for your team to run with.
Step 1: Plot Your CRM Data on the Map
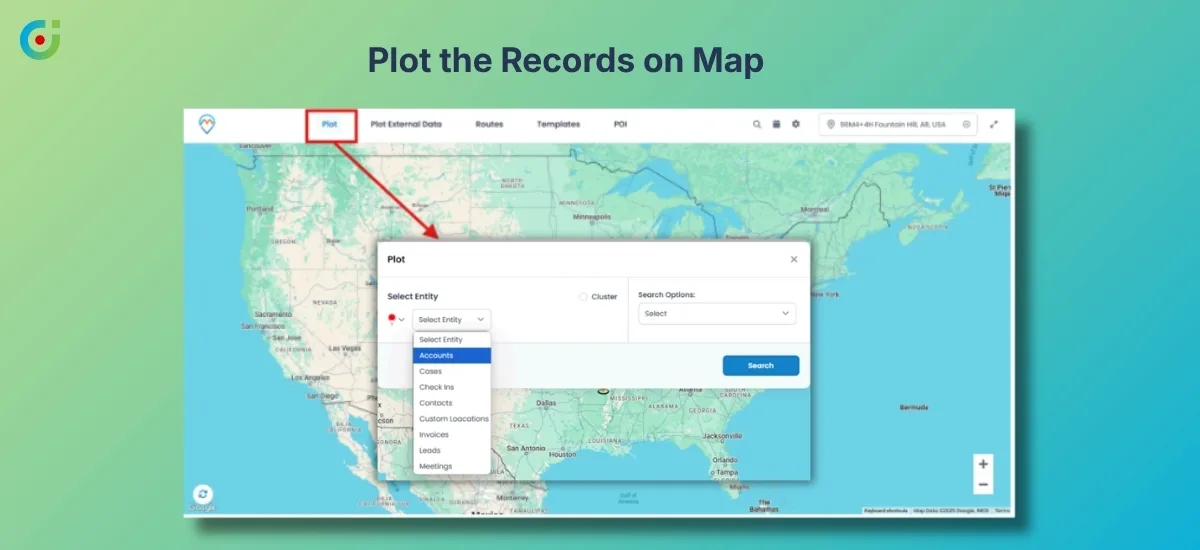
Start by selecting the CRM entities you want to work with — accounts, leads, contacts, or all three. AppJetty’s MappyField 365 pulls those records and drops them as pins on an interactive map inside Dynamics 365 map. No exports, no platform switching, no manual address entry.
Once the data is on the map, apply filters to segment by industry, revenue range, lead status, account tier, or any custom CRM field. A list of records becomes a live visual of where your market is concentrated, where it is thin, and where you are not present at all.
Step 2: Analyze Your Data Distribution
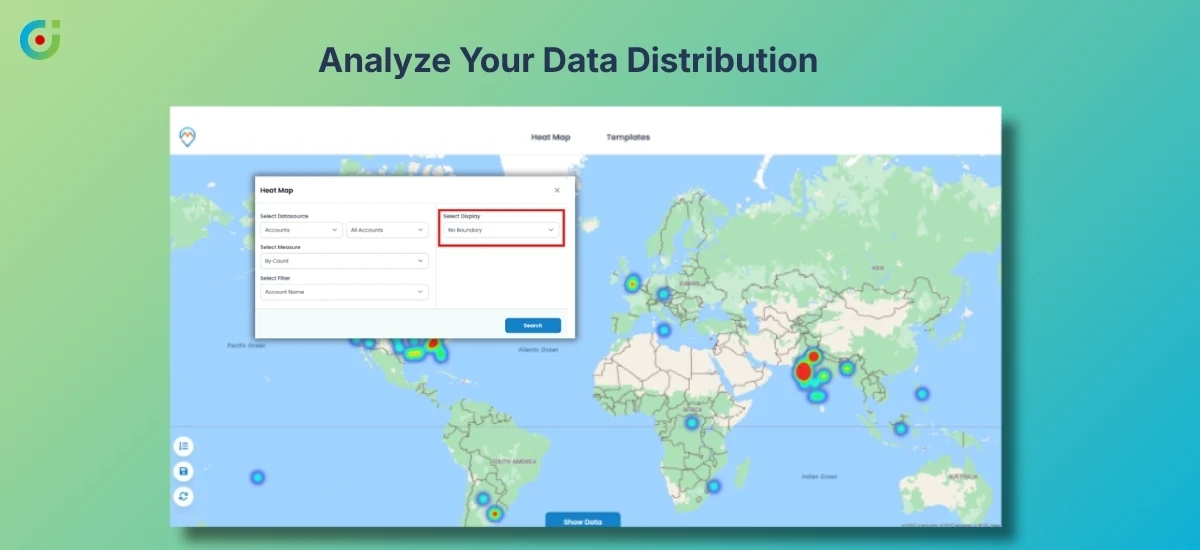
Before touching the drawing tools, switch on the Heat Map view and let the density patterns do the talking. This is where Dynamics 365 geo mapping proves its value, dense zones surface immediately, and so do the gaps. Areas where you have little coverage despite a real market sitting right there become impossible to miss.
A tight cluster of accounts in one city might need two reps instead of one. A quiet region might be low priority or a gap worth targeting. Either way, decisions come from what the map is showing, not from assumptions made in a meeting nobody remembers clearly.
Step 3: Draw or Define Territory Boundaries
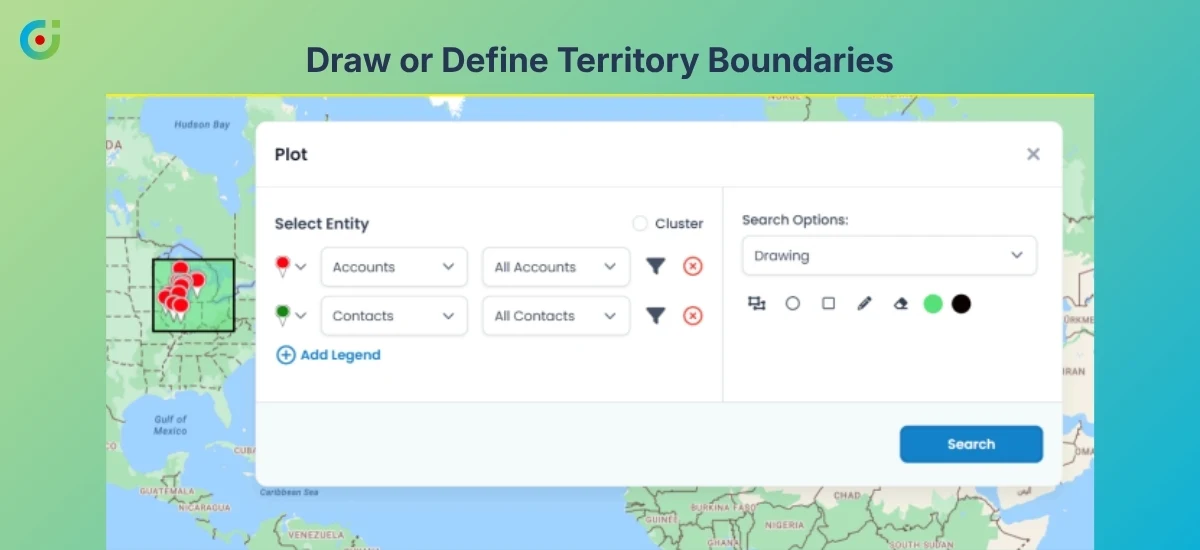
With the data read and patterns understood, start building. AppJetty’s MappyField 365 lets you create shapes on map using freehand drawing or structured geometric shapes, keeping every boundary tied to real geography.
For multi-level teams, the Country, Region, City, and Rep Level features let you layer the structure properly. Leadership sees the national or regional picture. Individual reps see only their zone. The hierarchy holds together cleanly without creating overlapping assignments or leaving anyone wondering which part of the map they actually own and are responsible for.
Step 4: Assign Sales Reps to Territories
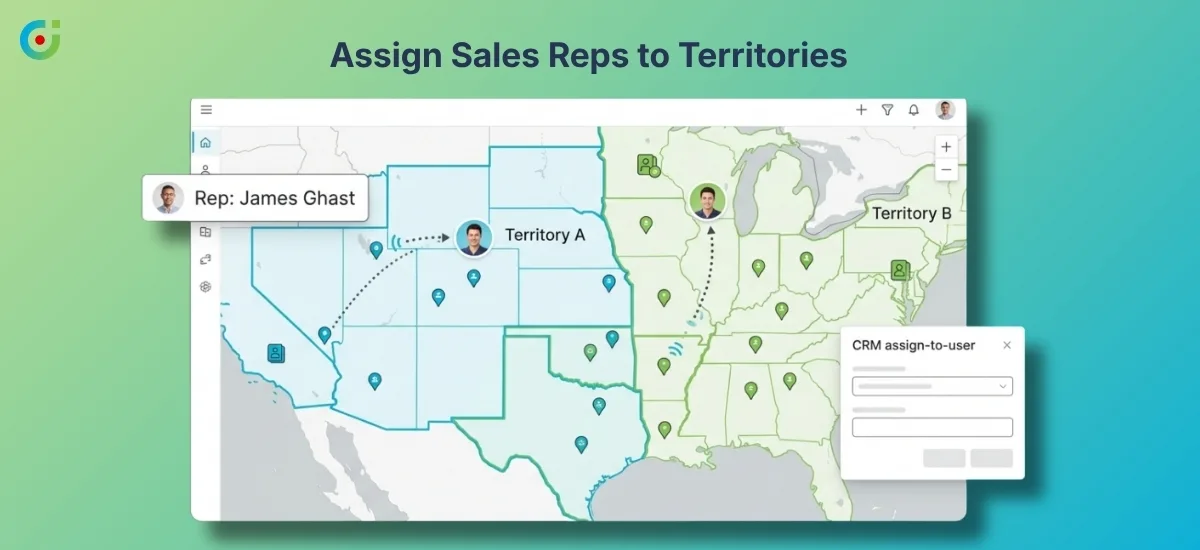
With boundaries defined, connect your CRM users or teams to each territory zone. Effective sales territory management in Dynamics 365 means ownership is never ambiguous, and MappyField 365 makes that happen automatically. Accounts and leads that fall within a boundary get assigned to the right rep based on location, with no manual sorting required.
The moment a territory goes live inside Dynamics 365, every record already has a clear owner. Accountability is built into the system from day one, and nobody has to ask who is responsible for a particular account or region again.
Step 5: Review Territory Balance
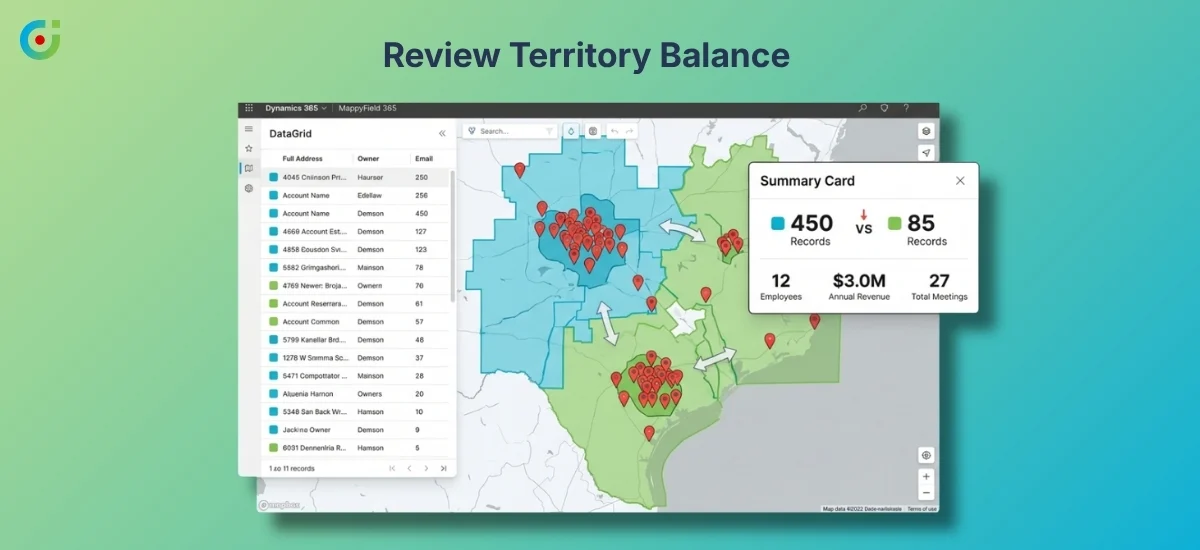
Pull up the Summary Cards and DataGrid view to see exactly how many records sit inside each territory. This is where imbalances surface before they become real problems. One rep carrying 450 accounts while another manages 85 is not a personnel issue, it is a field sales territory planning issue.
Adjust the boundary, shift a cluster of accounts, and check the numbers again. Repeat until the distribution makes sense for your team size and capacity. Catching this at the review stage is significantly easier than fixing it after your reps are already out working their zones.
Step 6: Save and Share Territory Templates
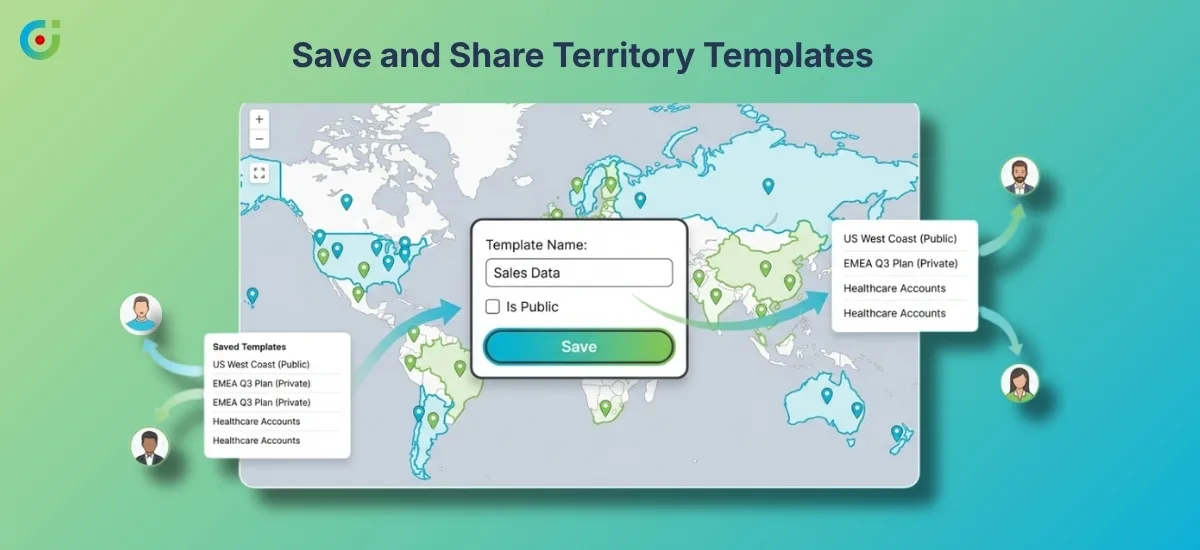
Once territories are balanced and every rep has a clearly defined zone, save the full configuration as a reusable template. New rep joining the team? Opening up a new city? Running a quarterly territory review? The structure is already built. Share it directly with managers and team leads so the entire organization works from the same setup without rebuilding it each time.
No version confusion, no whiteboard sessions trying to recall how the boundaries were drawn, and no one making unilateral changes to a territory because the original was never properly saved or documented.
Conclusion
Sales territory management in Dynamics 365 is not a one-time setup task; it is an ongoing decision that directly affects how your team performs, how work gets fairly distributed, and how much revenue your organization actually captures. When territories are built on real data rather than rough geographic splits and outdated assumptions, the difference shows up fast. Reps perform better, managers have cleaner visibility, and the business stops losing deals to poor coverage.
Dynamics 365 geo mapping through AppJetty’s MappyField 365 makes the entire process visual, fast, and completely native to your CRM. You are not jumping between platforms or manually cross-referencing spreadsheets. Everything — from plotting data and drawing boundaries to assigning reps and reviewing balance — happens in one place, on a live map, with your actual CRM data driving every decision.
If your current territory setup was built on gut feel, it is worth taking a closer look at how structured field sales territory planning could improve your numbers.
Ready to see it in action? Explore MappyField 365 Map and take the first step toward territory planning that actually works for your team.


